
Mini Excavator Delivery and Setup Checklist for Overseas Buyers
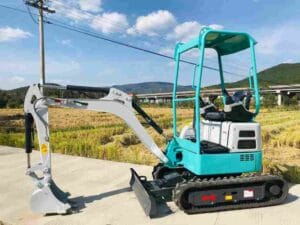
Buying a mini excavator from overseas is exciting, but the real work does not end when the invoice is paid. The machine still has to be packed, shipped, unloaded, checked, started, tested and prepared for real jobsite work. For contractors, dealers and rental companies, this stage is where many small mistakes become expensive headaches. A loose hose, missing pin, low oil level or wrong attachment size may not look serious at first, but it can quickly turn a new machine into a very quiet decoration in the yard.
This mini excavator delivery and setup checklist is written for overseas buyers who want a simple but professional process. It explains what to confirm before shipment, what to check after arrival, how to test the machine safely and how to avoid common attachment matching problems. The language is practical because the goal is practical: help the machine arrive safely, start smoothly and work reliably.
Before Shipment: Confirm the Machine Before It Leaves the Factory
A good delivery starts before the mini excavator is loaded into a container. Buyers should confirm the model, operating weight, engine option, bucket size, track type, attachment list and spare parts package in writing. This sounds basic, but it is the kind of basic step that saves a lot of trouble later. When one order includes several machines or mixed attachments, clear confirmation is even more important.
For example, a 1 ton mini excavator used for garden trenching does not need the same setup as a 2 ton machine prepared for hydraulic breaker work. A dealer may need spare filters, extra bucket teeth and product labels. A contractor may care more about quick setup and attachment readiness. Before shipment, the buyer and supplier should confirm the details like engineers checking a drawing before cutting steel: slowly, clearly and without guessing.
Pre-Shipment Checklist
- Confirm mini excavator model, operating weight and engine configuration.
- Confirm bucket size, quick hitch requirement and attachment list.
- Check hydraulic flow and pressure if using a breaker, auger or grapple.
- Confirm pin diameter, pin center distance and arm width for attachments.
- Confirm manuals, spare parts, tool kit and maintenance items.
- Ask for machine photos, packing photos and loading photos before shipment.
Export Packing: Protect the Machine During the Long Trip
Export packing is not only about making the machine look tidy in a container. It should protect the mini excavator from vibration, movement, moisture and handling damage during transport. The boom, arm, bucket and blade should be positioned securely. Loose attachments should be fixed separately, and small parts should be packed in a marked box. Nobody wants to spend the first day after delivery searching for pins like they are hidden treasure.
Overseas buyers should ask for photos before the container is closed. These photos are useful because they show the machine condition, attachment placement and tie-down method before shipping. Buyers can also review general cargo securement rules from FMCSA to understand why stable positioning, accessory restraint and clear loading records matter during equipment transport. If the machine arrives with transport damage, these records help both sides understand what happened and solve the issue faster.
Arrival Inspection: Do Not Start Work Too Quickly
When the mini excavator arrives, the first reaction may be to start it immediately. It is understandable, but not wise. Before startup, inspect the machine carefully under good light. Compare the machine with the pre-shipment photos and look for dents, broken covers, loose parts, oil marks, damaged hoses or missing accessories. This inspection does not need complicated tools, but it does need patience.
After the outside check, move to the important service points. Check engine oil, coolant, hydraulic oil and fuel level according to the manual. Inspect hydraulic hoses, fittings, cylinders, track tension, rollers, sprockets, bucket teeth, pins and the quick hitch if equipped. General pre-operation inspection guidance from CCOHS also supports this habit: check equipment before use, not after trouble appears. If anything looks wrong, take photos and videos before operating the machine. A clear video is often more useful than ten long messages.
Arrival Inspection Checklist
- Check machine body, boom, arm, blade and counterweight for damage.
- Inspect hydraulic hoses and fittings for leaks or rubbing marks.
- Check engine oil, coolant, hydraulic oil and fuel before startup.
- Inspect track tension, rollers, idlers and sprockets.
- Confirm bucket pins, safety locks and attachment connections.
- Test lights, horn, seat belt and safety lock if the machine has them.
First Startup and Setup: Let the Machine Wake Up Slowly
The first startup should be done in an open and level area. Start the engine and let it idle for a short time before applying load. Listen for unusual noise, watch the dashboard and check whether the engine runs smoothly. A new machine does not need a dramatic first performance. It needs a calm first test, just like a good operator does not prove skill by moving fast, but by moving correctly.
After idling, test the boom, arm, bucket, blade, swing and travel functions without heavy load. The movement should be smooth and predictable. If the machine has pilot controls or a control pattern that is different from the operator’s habit, learn it before entering a real work area. OSHA’s guidance on operator instruction and hazard recognition is a useful reminder that setup is also a safety and training step, not only a mechanical check. After a short test, stop the engine and inspect again for oil leaks, loose fittings or abnormal heat.
Attachment Matching: The Small Details Decide Whether It Works
Many setup problems are not caused by the excavator itself. They are caused by attachments that do not match the machine correctly. A bucket may look suitable in a photo but fail to fit because the pin size is wrong. A hydraulic breaker may connect to the excavator but perform poorly if hydraulic flow or pressure is not suitable. This is why attachment matching should never be based only on appearance.
Before using any mini excavator attachment, confirm the machine operating weight, pin diameter, pin center distance, arm width, coupler type, hydraulic flow, hydraulic pressure and attachment weight. This is especially important for hydraulic breakers, earth augers, thumbs, grapples and rakes. Correct matching protects the hydraulic system, improves working efficiency and reduces unnecessary wear. In simple words, the right attachment makes the excavator look smart; the wrong one makes everyone on site look busy for the wrong reason.
First 10 Working Hours: Watch the Machine Carefully
The first 10 working hours are an important observation period. Operators should monitor engine sound, hydraulic response, travel performance, track tension, fuel use and attachment behavior. After early operation, check bolts, pins, bucket teeth, quick hitch locks and hydraulic fittings again. Small looseness at the beginning is easier to solve than a failure in the middle of a job.
Dealers and rental companies should also prepare basic spare parts before the machines go to customers. Filters, bucket teeth, pins, bushings, seals, hydraulic hoses and maintenance parts can reduce downtime. For overseas buyers, ordering common spare parts together with the machine is often more efficient than waiting until a small part stops a big job.
After-Sales Support: Give Clear Information to Get Faster Help
Good after-sales support depends on clear communication. When asking for help, provide the mini excavator model, working hours, attachment type, photos, videos and a short description of the issue. A video showing the sound, movement or warning light can help technicians judge the problem much faster.
Before placing an order, overseas buyers should also confirm whether the supplier can support spare parts, attachment matching, maintenance guidance and troubleshooting after delivery. A mini excavator is not a one-time purchase. It is a working tool that needs support, especially for dealers, contractors and rental fleets that depend on machine uptime.
FAQ About Mini Excavator Delivery and Setup
What should I check first after a mini excavator arrives?
Start with visible transport damage, missing parts, fluid levels, hydraulic hoses, track condition, bucket pins and safety devices. Do not begin real work before the basic inspection is complete.
Why is attachment matching important?
Attachment matching affects fit, hydraulic performance and machine safety. Buyers should confirm pin size, arm width, operating weight, hydraulic flow and hydraulic pressure before using powered attachments.
What spare parts should overseas buyers prepare?
Useful spare parts include filters, bucket teeth, pins, bushings, seals, hydraulic hoses and basic maintenance items. Dealers and rental companies should prepare more wear parts for faster service.
Request Mini Excavator Delivery and Setup Support
ACE Machinery supports overseas buyers with mini excavator model selection, export packing, attachment matching, spare parts preparation and after-sales communication. To get a suitable recommendation, please send your machine model, working application, attachment list, destination country and order quantity. Our team will help confirm the delivery and setup details before shipment.